
Here’s a quick tutorial on how to properly setup and import iCal information into your ServiceWorks account
Locating Your ICal URL
To begin, open Google Calendar in your web browser. On the left-hand side, under “My Calendars,” locate the calendar you want to retrieve the iCal URL for. If the calendar is not listed, make sure it is added to your Google Calendar account.
Click on the three dots next to the calendar’s name, and within the dropdown menu, select “Settings and Sharing.“


In the following menu, scroll down to the “Integrate Calendar” section. Under the “Public address in iCal format” field, you will find the iCal URL for that particular calendar. The URL will start with “webcal://” or “https://” and end with “.ics”. Highlight the address and copy the iCal URL to your clipboard and be sure to set the calendar to Public before moving on.

Configuring Your Calendar in ServiceWorks
Now that you’ve copied your iCal URL, its time to paste it into your ServiceWorks account. To do so, login to your account, use the cogwheel in the upper right hand corner to open the Configurations Tab, and navigate to Integration -> iCal

In the iCal screen you’ll have the following options for setting up your integration process:

Name – Use this field to create a name for the integrated calendar. We recommend using something recognizable such as a location for easier schedule viewing
Customer – Use this field to associate the URL with a customer account currently in your system. (Note: Any customers or parent customers in this section must be in the system PRIOR to enabling iCal integration)
Account Number / Address – These sections will auto-populate with the designated customer’s information
URL – This is where you will paste the URL copied from your calendar in the previous steps
Check-In / Check- Out Time – Use this field to designate the check in and out time for each reservation (Note: This field MUST BE FILLED OUT in order to auto-populate jobs into the dates inbetween reservations)
Enable Job Creation – Enabling this will create a job at the end of each imported event from your integrated calendar. (Note: This MUST BE ENABLED in order to auto-schedule jobs at the end of calendar events)
Once you’ve finished entering in your information, click Save to confirm your iCal integration
Now that it’s been saved you should see the recently input information listed below in the menu. This can also be edited or deleted as well.
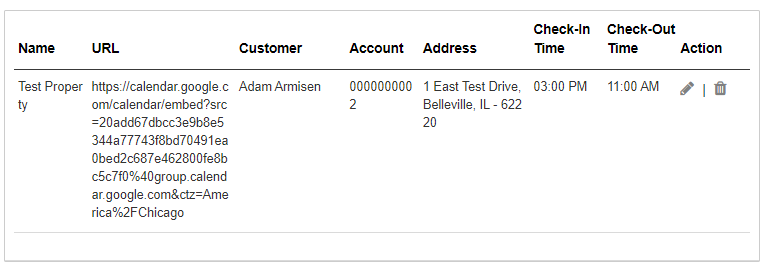
Importing Your iCal
Now that the URL has been properly setup within ServiceWorks, you’re ready to start importing your calendar. To begin, hover over the Customer tab on the toolbar and select Property Management

In the Property Management view, click on the Import button in the upper right hand corner

In the following popup menu, you’ll be able to set the following parameters for import:

- From / To Date – Set the date range to import your calendar
- Select File – Choose the previously setup URL file from the previous menu. In this example, we’ll be using the “Test Property” URL
Once finished with your selections, click Import to continue
Now that your jobs have been correctly imported, they should appear within the Property Management section of your ServiceWorks account
Need More Assistance?
Contact us:
Use the chat bubble on our site here
Email: support@service.works
Phone: 636-220-4363 Ext #1