


Please follow the below-mentioned instructions to integrate Shopify with ServiceWorks. There will be two-part instructions to make this process easy. The following actions will help you set up an account with Shopify and establish connectivity with ServiceWorks:
Please note, to correctly set up this integration, you will need to do the following:
1. Generate your API key from within Shopify
2. Enter your API key within ServiceWorks and complete the remainder of configuration
3. Create a Customer Support JIRA Ticket with your inventory location IDs in Shopify so that our team can correctly map them within your ServiceWorks account (more on creating JIRA tickets HERE)
Creating Your Shopify API
Log in to your Shopify account. Once logged in, select Apps in the panel on the left-hand menu.


In the search popup that follows, select App and Sales Channel Settings.


Next, in the apps and sales channels menu, click the View Custom Apps button.


Now in the next menu, either click on or search for the ServiceWorks API, called DeliveryWorks.


Note: If you don’t see the option to search for a custom app, you may need to click the Create an app button.
Once selected, click the Admin API integration in the following popup


Then fill out the following sections of your API Integration as follows:
Assigned Fulfillment Orders – A list of all the fulfillment orders that are assigned to an app at the shop level. Enable both read and write permissions


Customers – Allows for customer information to be viewed. Enable read permission for this module


Draft Orders – Purchases made by merchants on the behalf of customers. Enable both read and write permissions


Fulfillment Service – allows your items to be stored and shipped to customers, as well as handling returns. Enable both read and write permissions


Merchant Managed Fulfillment – for shipping, storing, and returning to merchants. Enable both read and write permissions


Orders – grants permission to create and manage orders. Enable both read and write permissions


Products – allows your various products to be viewed and managed. Enable read permission for this module


Store Content – allows content from your storefront to be viewable. Enable read permission for this module


Once finished, head back to the Storefront API link and enable the Allow this app to access your storefront data using storefront API checkbox.


Once everything is set, make sure to save the settings, and you will be prompted to the following screen:


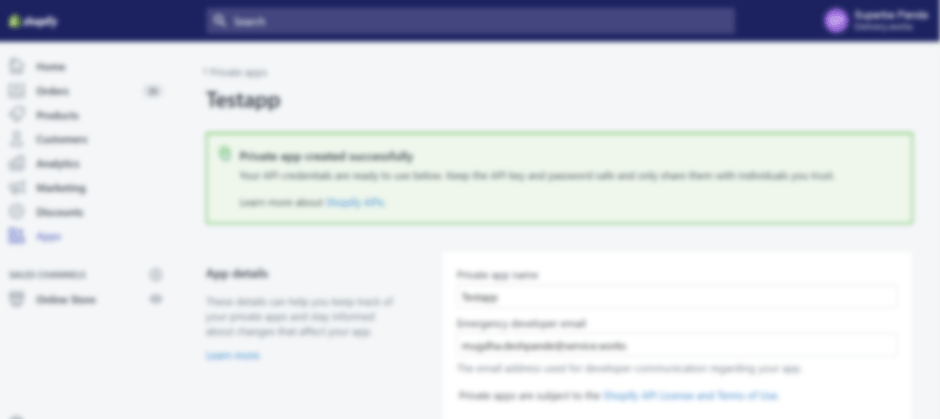
Accept the terms and conditions to create a new private app, then you will be prompted to the TestApp screen, which will have the app details like the private app name and emergency developer email. These details can help you keep track of your private apps and stay informed about changes that affect them.

The Admin API section will have the API key and password. There is a show password option besides the password, which will show the password that was generated. Please make sure to save the API key and the password. Treat the API key and password like you would any other password.


Entering the Shopify API into ServiceWorks
Back in ServiceWorks, click on the cogwheel to open up the Configuration tab and navigate to Integration -> Shopify


Once opened, you’ll have the following options for this menu:


Name – Set this to the same name used when creating your private app in Shopify
Store Name – Enter your shop’s domain name (This must be exact or else the sync process will not function)
API key – Enter the API key generated from Shopify
Admin API Key – Enter your Shopify password
Sync Shopify to ServiceWorks: Use this toggle to enable synchronization for all products, item details (price, cost, SKU), variant edits, and images from Shopify to ServiceWorks (Note: Item on Hand count will not sync from Shopify )
Sync ServiceWorks to Shopify: Use this toggle to enable synchronization for all created items, modified items, and inventory quantities from ServiceWorks to Shopify (Note: This will NOT update edited item descriptions automatically. These will need to be manually updated within Shopify.)
Once finished with your selection, click Save to continue
And now that you’ve successfully integrated your Shopify account, you should begin to see your Shopify orders populate within the Orders section of the notification bell tab. Orders created through Shopify will have Shopify as the salesperson.
Note: Items ordered through Shopify will deduct from your default inventory location .
Common Errors
While attempting to synchronize your Shopify account with ServiceWorks, you may encounter the following errors. Should any errors occur, an error log will be sent to the email address on file. Here’s what they mean and how to fix them:


- Variant Item Already Exists: This error message will appear when a variant is created within ServiceWorks that already exists within your Shopify account. This can be corrected by editing one of the options within the created variant.
- Must Be Greater Than or Equal to 0: This error message means that the price or cost of the item is a negative number. This can be corrected by entering an amount greater than or equal to zero in either field.
- Image URL is Invalid: This error message means the image being synced is invalid. This can be corrected by either deleting the image in ServiceWorks or manually uploading an image.
- Cannot Have More Than 3 Options: This error message means that a variant has more than three options, which is the current limit for the synchronization process with Shopify. This can be corrected by either deleting an option from a variant, or creating a new item with the additional variant options.
Need More Assistance?
Contact us:
Use the chat bubble on our site here
Email: support@service.works
Phone: 636-220-4363 Ext #1

