
Within the ServiceWorks software, you can allow your customers to schedule their own services, view their payment history, service history, sales history, and even make payments through the use of the Customer Portal module. This module allows for ease of use, giving the customer more options and control over how their services are scheduled. Here’s a brief tutorial on how to enable this for your customers, as well as what they’ll see when they access the portal.
Enabling Customer Portal
First, you’ll need to configure what information is available for your customers to view in the Customer Portal. Open the configuration tab and go to Configuration -> Customer -> Customer Portal Settings
From this screen, you’ll have a few options on what to enable / disable for your customers:

You can use the Edit Customer Portal Template button to edit the notification that is sent whenever a new job request has been submitted via the customer portal

- Show Credit – Displays credit on customer account
- Show Sub Customer – Displays sub customer status in portal
- Sub Customer Checked – Enforces “Sub Customer” check for all services requested through customer portal
- Show Pickup Address – Displays the customer’s assigned pickup address
- Show Service Address – Displays the customer’s service address
- Allow Upload Content – Gives customer access to uploading files and photos related to services
- Can Create Job – Gives customer access to schedule their own services
- Show Service History – Displays the customer’s previous service history
- Show Sales History – Displays the customer’s previous sales history
- Can Make Payment – Allows customer to make payments on services via customer portal
- Show Payment History – Displays customer payment history in portal
- Show Payment Method– Displays the customer’s most recent payment method
- Show Schedule Date – Displays the scheduled date of the customer’s requested job
- Show Schedule Type – Displays the schedule type of the customer’s requested job (AM, PM, All Day, etc.)
- Show Job Type – Displays a selector for job types in the customer portal
- Show Google Translator – Allows access to page translation via Google in customer portal
- Show New Address – Displays a field for an additional address to be entered
- Show Completed Job Form – Displays any completed job forms in the customer portal
- Filter Date for Payment History – Allows customer to filter between payment dates
- Custom Label For Job Type – Creates custom label for services on customer portal
Beneath these options, you’ll see toggles to enable or disable any custom job fields you have created in your ServiceWorks account

As well as these toggles below to hide / display columns of the customer portal

Once finished, be sure to click Save before you continue
Setting up Customer Portal ID
Now that you’ve enabled what you want your customers to have access to, you can now create a username and password for their account.
To do so, navigate to the Customer section on the toolbar and select Customers

Next, in the Customer view, hover over the three dots at the end of the customer you wish to create a log in for and select Edit.

Once in the edit menu, scroll down to the Customer Portal Settings panel. In this panel, you’ll be able set and view the following information:

- Your Company ID – The number displayed here will be your company ID. Your customers will need this to log into their account
- Portal Link – This is the link to the customer portal.
- Customer Login ID – Create a username for your customer
- Customer Password – Create a password for your customer
Once finished with the username and password creation, be sure to click Save at the bottom of the screen to preserve your changes
(Note: You will need to provide the Company ID, Portal Link, Customer Login & Password to your customers manually, as this is not an automated process once configured within the system. We recommend sending this information to your customers via email or SMS message)
Accessing the Customer Portal
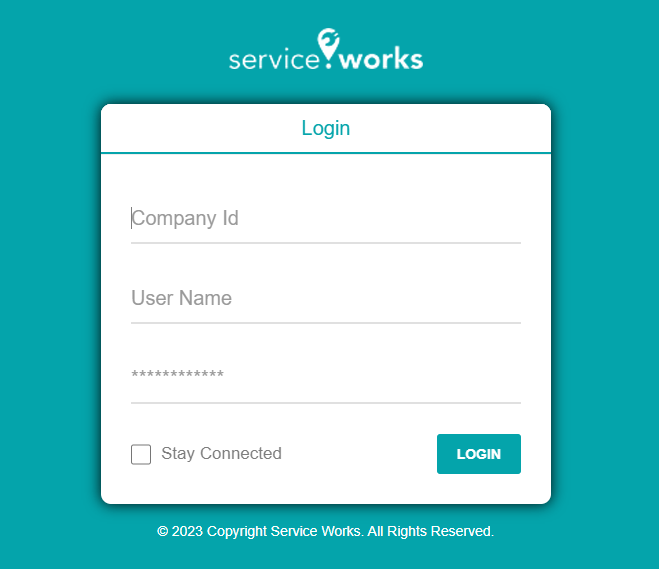
Now that your customer has their login information, they’ll be able to enter that in the customer login screen. This menu is similar to your employee login screen, with the exception of the Company ID field.
Once logged in, this is what your customers will see:

This initial dashboard menu will show a few at glance details, such as the customer’s account information, any payments currently due, their service location, any cards saved on file, and if any sub customers are registered under their account.
Over on the right, there are also a few pages that they can access (if you’ve enabled these fields from earlier configuration)
Service Request
From this menu, the customer can request and schedule their next appointment. Once the request has been processed, you’ll receive a notification on the desktop side. Note: This method of scheduling does not assign a technician to a service. That will still need to be done manually on the desktop version of ServiceWorks

Service History
On the Service History page, the customer can perform a filtered search their past service history. They can also make payments from this menu using the Payment link or view the invoice of each job by clicking on the three dots next to each service.

Sales History
In the Sales History page, the customer can see all their past sales history. They can also see the invoice of each job by clicking on the three dots on the right and then selecting Invoice.

Payment History
In the Payment History page, customers can view a log of their payments. This will display the invoice number, payment amount, mode of payment, and the date on which the payment was made.

Payment Method
On the Payment Method page, your customer can view and edit all saved payment methods on file.

Need More Assistance?
Contact us:
Use the chat bubble on our site here
Email: support@service.works
Phone: 636-220-4363 Ext #1