


Managing warranty claims can be one of the most time-consuming tasks for service companies. Missing information, incorrect model numbers, and confusing submission procedures often result in denied claims or delayed payments.
With ServiceWorks, you’re already equipped with powerful tools that streamline your warranty workflow—once you know how to use them. This guide covers the entire warranty claim lifecycle inside ServiceWorks, from initial setup to payment reconciliation.
Why Efficient Warranty Claim Processing Matters
Warranty work is profitable, but only if you get paid. Slow or inaccurate claim handling can lead to:
- Denied claims
- Cash flow delays
- Wasted administrative time
- Customer and technician frustration
So understanding the correct way to process your warranty claims is incredibly important to maintaining smooth operations.
Step 1: Configure Your Warranty Claim Processors , Manufacturers, and Distributors (One-Time Setup)
Before attempting to submit claims, you’ll first need to verify that your warranty processors are configured within your account as well as any associated manufacturers. This will ensure that your warrantied jobs are synched correctly with ServiceWorks for both acceptance and submission.
Warranty Processor Setup
To begin the process of configuring your warranty processors, start by logging into your ServiceWorks account then clicking the cogwheel in the toolbar to open the configurations tab. Once opened, navigate to Integration -> Claim Processors Setup


Once in the claims processor menu, you can view all of the current processors integrated with your ServiceWorks account. If this is your first time visiting this menu, it should be empty. To create a new claims processor setup, click the plus button.


In the following popup menu, you can enter in the details and credentials for your specific claims processor. While this process will mostly be the same for each processor entered, there are a few things you should note while entering in your information:


Part Submission to Claim
In this field, you’ll define whether your submitted claims are based on the cost or the price of warrantied items/services.


An easy way to determine which is right for you is:
Cost submission = reimbursement based on what it actually cost you.
Price submission = reimbursement based on what the manufacturer allows or predefines.
Auto Accept / Send Sub-Status
By clicking the Auto Accept and the Send Sub-Status checkboxes, you’ll allow the following:
Auto Accept – Enabling this will allow for any jobs sent to you by the processor to be automatically accepted for scheduling when sent
Send Sub Status – Enabling this will allow ServiceWorks to sync the current job status of the warrantied job to your processor, preventing the need to update it on your processor’s end.
Sync Claim Status & Payment – Enabling this will automate the process of changing the claim’s status and logging any payments made


Now enter any required credentials, API keys, and account details. ServiceWorks will use these when submitting claims. Click Save when finished.
Once saved, you’re claim processor list should be similar to the example below. Each of the green checkmarks validates that the feature is enabled or your account has been verified


And once the credentials have been entered and verified, your jobs should begin appearing within your notification tab. You can schedule these jobs by clicking the Save & Assign button or opt to reject the job by clicking the Decline button


Manufacturer
Within the Manufacturer settings, you’ll want to ensure that the OEM Number for the manufacturer and the Account Number for the brand match what is listed within your warranty claims account.
ServiceBench
PLEASE NOTE: The OEM / Account Number will only be available within your personal ServiceBench account. It can be located by clicking the Admin tab and then navigating to Service Providers -> ServiceProvider Profile -> Accounts


ServicePower
PLEASE NOTE: The OEM / Account Number will only be available within your personal ServicePower account. It can be located by clicking the Settings tab and then navigating to Coverage -> Networks


Once you’ve copied your account numbers, you’re ready to enter them in the appropriate Manufacturer listing in ServiceWorks.
Start by clicking the cogwheel in the toolbar to open the Configurations tab and navigate to Configuration → Inventory Settings → Manufacturer


In the following manufacturer menu, you’ll be able to view, edit, and delete any created manufacturers and their associated brands. To enter your OEM Number, click the Edit or pencil icon next to your listed manufacturer (if you haven’t created one yet, click the New Manufacturer button)

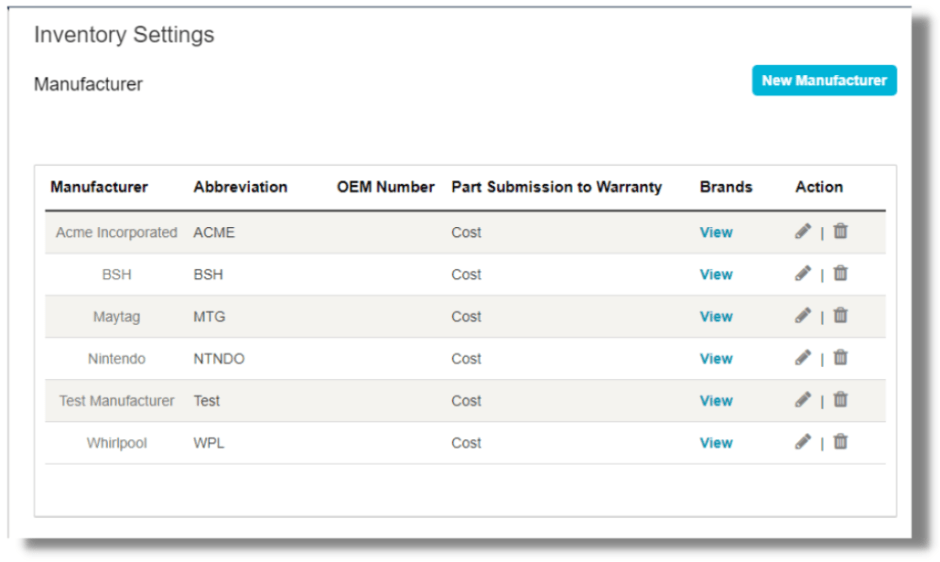
You’ll be presented with the following options when editing or creating your manufacturer:


- Manufacturer Name – Enter your manufacturer’s name
- Abbreviation – Enter an abbreviation for your manufacturer’s name. This will appear when selecting your manufacturer within ServiceWorks
- OEM Number – Enter the manufacturer’s OEM number for parts. This is where you will paste your numbers from your ServiceBench account
- Part Submission to Warranty – Use this dropdown to determine whether to submit the Cost or Price of the item to warrantied claims
When finished, click Save to continue, and you’re newly created changes should appear in the previous list. Your account number will also appear when creating brands for manufacturers.


Distributor Setup
In your distributor settings, you’ll want to ensure that the Account Number matches correctly with what is listed in your claims provider account.
ServiceBench
PLEASE NOTE: The account ID will only be available within your personal ServiceBench account. It can be located by clicking the Admin tab and then navigating to Part Distributor & Vendor Maintenance


ServicePower
PLEASE NOTE: The account ID will only be available within your personal ServicePower account. It can be located by clicking the Settings tab and then navigating to Coverage -> Networks


Once you’ve copied your account numbers, you’re ready to enter them in the appropriate Manufacturer listing in ServiceWorks.
To find your distributor settings, click on the cogwheel in the toolbar and navigate to Inventory Settings -> Distributor


In the following menu, you’ll be able to see a list of previously created distributors, along with a brief overview of their contact information. To add the account information, click on the Edit or pencil icon next to the distributor name (if you haven’t setup a distributor yet, click the New Distributor button)


In the following menu, click on the Manufacturer Distributor Mapping tab.


And in this tab, you can select your manufacturer, paste or enter their account number and click the Add button to save it within your account.


Mapping
The following will show what each claims processor will map within ServiceWorks


With your claims processors now integrated, you can now continue to schedule and service jobs.
Step 2: Ensure Your Job Is Ready for Claim Submission
. Before anything else, confirm that the following is either setup or completed in the job before moving forward with the claim:
- The job / Item status is Delivered: In the ServiceWorks system, only jobs and items marked as delivered will be considered claimable. Be sure that any jobs or items attempting to be submitted have their status set to Delivered.


- The job has been marked as Warranty: Another important step in the process of submitting a warranty claim is marking the job as such. This will ensure that the job itself shows up in the Warranty Claims menu.


While you’ll always need to ensure the job is marked as delivered and a warrantied product for claims submissions, here’s a list of other things to consider before moving onto the next step:
- Dispatch Number: There should be Dispatch number / Call number present
- Product Details: Brand, Product Family, and Product Details are required
- Product Details: Model & Serial Number must be filled in the Product section
- Claim Processor: Desired Claim Processor selected as the respective service administrator
- Part Billing: SET TO MANUFACTURER for whom you are doing the warranty
- Labor Billing: SET TO MANUFACTURER for whom you are doing the warranty
- Defect Code, Repair Code: enter defect code and repair code if available and required
- Item information: Have the invoice number for the item you have installed , ensure the disposition of the part is installed, ensure the right distributor is mentioned for the parts that were used for the job you are submitting the claim for
- Co pay: If there a Co pay that shows on the banner then add the co pay as other charge and ensure the bill to is set to Customer.


Once confirmed and completed, you’re ready to begin processing your warranty claim
Step 3: Submitting Your Claims
After completing a job, any jobs with claimable items will begin to appear within the warranty claims section when ready to be sent off.
To reach this menu, hover over the Jobs tab in your ServiceWorks account and click on the Warranty Claims section from the dropdown that appears


In the following menu, you can see all jobs that have been submitted, unsubmitted, or are currently in the process of a warranty claim.


To submit a claim, first click on the checkbox next to the job number listed below (or use the search fields to locate the job)


Once selected, click the Action button and select one of the following:


- Submit ServiceBench / ServicePower Claims – If you’ve integrated either of these, clicking this button will submit any of the following claims to these processors
- Download ServicePower Claim File – This option is for those who’d rather manually send their ServicePower claims. Clicking this option will download a claims file that can be uploaded via your ServicePower account.
- Manually Submitted – For all other warranty providers, clicking the manually submitted button will submit your warrantied jobs via the information used to setup your claims processor.
Here’s a few more tips for submitting claims:


Step 4: Warranty Claims Receivable
Once your claim has been submitted and approved, the warranty company will issue payment. To record these payments from your distributor or vendor, you’ll need to utilize the Warranty Claims Receivable menu.
From within your ServiceWorks account, click on the Accounting tab on the toolbar and then select Warranty Claims Receivable from the dropdown menu.


In the Warranty Claims Receivable menu, you can view all vendors to whom you still owe payments.


To apply a payment to a vendor, click the three dots at the end of any listed vendor with an amount due and click Payment from the dropdown menu.


In the following menu, you’ll be able to view a list of claims that are due for the vendor. Click the checkbox next to the claim(s) you wish to apply payment for and then click the Proceed to Payment button.


And in the payment screen, you can select the amount to pay, the date the payment should be applied, and the type of payment.


Once the payment information has been entered, you can click the Take Payment button or opt to Write Off the payment.


Once applied, you’ll be returned to the previous menu. You can then use the Payment View option by clicking on the three dots and selecting it from the dropdown to view the recently applied payments and any others, including the method of payment.


Tips & Troubleshooting
Overdue Warranty Receivable Report:
Need an extra method of making sure your vendor payments are processed in time? By utilizing the Overdue Warranty Receivable report, you can monitor any claims with overdue payments. Just use the filters to set the date range, overdue range, vendor, distributor types to have a list of all overdue claims generated. You can then use the Pay option at the end of the list to be taken directly to the payment processing page for that vendor.


